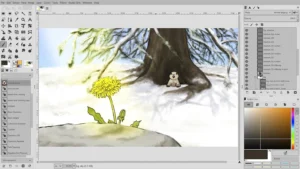
Imagine GIMP as a digital canvas waiting for your creative brushstrokes. This open-source software offers a world of possibilities for image editing and manipulation.
Curious about how professionals and hobbyists alike harness its power? Stay tuned to uncover the intricacies of GIMP’s features, its unique advantages over other editing tools, and tips for beginners looking to unlock their creative potential.
Explore the world of GIMP – where your imagination meets digital reality.
Origins of GIMP
The origins of GIMP can be traced back to the early 1990s when developers at the University of California, Berkeley, began working on a free alternative to expensive image editing software. Frustrated by the high costs and limited accessibility of existing programs, these developers sought to create a tool that would empower users of all backgrounds to manipulate images without financial barriers.
Drawing inspiration from the principles of open-source software, the team set out to develop a powerful yet free platform that could rival proprietary image editing software.
As the project gained momentum, more developers worldwide joined forces to contribute to this innovative software. Their collaborative efforts led to the birth of GIMP, the GNU Image Manipulation Program, which was officially released to the public in 1996.
Since then, GIMP has evolved into a versatile and feature-rich image editing tool that continues to be maintained and enhanced by a dedicated community of developers and enthusiasts.
Key Features of GIMP
Exploring GIMP reveals a diverse array of powerful tools for image manipulation. From essential features like layers, masks, and filters to more advanced tools such as customizable brushes and paths, GIMP offers a comprehensive toolkit for editing images with precision. The software supports a wide range of file formats, allowing you to work seamlessly with different types of images.
One standout feature of GIMP is its flexibility and extensibility through plugins and scripts. These add-ons can enhance your editing capabilities by providing specialized tools or automating repetitive tasks. Additionally, GIMP’s non-destructive editing allows you to make changes to your images without altering the original file, preserving the integrity of your work.
Moreover, GIMP’s robust selection tools enable you to precisely isolate and manipulate specific areas within an image. Whether you need to remove a background, create a composite image, or apply selective adjustments, GIMP’s selection tools offer the precision you need for professional-level editing.
GIMP Vs. Other Editing Software
When comparing GIMP to other editing software, you’ll notice distinct differences in their user interfaces and available features. GIMP, known for its open-source nature, offers a wide range of tools for image editing and manipulation. In contrast, proprietary software like Adobe Photoshop may have a more polished interface but comes with a hefty price tag. GIMP’s interface, while functional, may seem less intuitive to those accustomed to other editing programs. However, GIMP’s flexibility and extensive customization options make it a powerful tool once you get the hang of it.
In terms of features, GIMP holds its ground against many commercial editing software options. It provides advanced editing capabilities like layer masks, filters, and customizable brushes. While it may not have all the bells and whistles of some high-end software, GIMP’s feature set is robust and constantly evolving through community contributions.
GIMP for Beginners: Getting Started
Begin your journey with GIMP by diving into the basics of image editing. To get started, familiarize yourself with the GIMP interface. The main toolbox on the left provides various tools for editing, while the layers, channels, and paths dialogues on the right allow for more advanced editing options. Import your image by going to File > Open and selecting the file you want to work on.
Experiment with basic editing tools such as the paintbrush, eraser, and selection tools to get a feel for how they work. Adjust the size, opacity, and hardness of your brushes to customize your editing experience. Utilize the color tools to change the colors in your image or apply filters to add different effects. Remember to save your work regularly by going to File > Save or Save As to keep your progress safe.
Advanced Techniques With GIMP
To enhance your image editing skills in GIMP, consider mastering advanced techniques that elevate your creative possibilities.
One advanced technique is non-destructive editing, where instead of permanently altering your image, you use layers, masks, and adjustment layers to make reversible changes. This allows you to experiment freely without losing the original image quality.
Another powerful feature is the use of paths and curves for precise selections and adjustments. Paths help create detailed selections, while curves offer fine-tuned control over brightness and color levels.
Utilizing blending modes can also enhance your editing capabilities by allowing you to combine layers in unique ways to achieve different effects.
Additionally, understanding and utilizing advanced filters and plugins can take your editing to the next level, providing you with a wide range of creative options.
Conclusion
Now that you understand what GIMP is and how it can be used for image manipulation, you’re ready to explore its features and start creating your own masterpieces.
Don’t be intimidated by its advanced techniques – with practice and patience, you can unlock the full potential of this powerful editing software.
So go ahead, dive in and unleash your creativity with GIMP!

Leave a Reply